

Your loader is down, the job is waiting, and a track that matched the size chart won't seat right on the undercarriage. That's the expensive way to learn that Posi Track tracks aren't bought by width alone. Check the size code, the drive system, and how the machine works now, and you'll order once instead of twice.
Table of Contents
- Why Posi Track Tracks Are Not One-Size-Fits-All
- Read Your Current Track Size in Three Numbers
- Why Matching Dimensions Is Not Enough
- Matching the Track to How the Machine Is Used
- How to Verify Fitment Before You Order
- Tension and Wear Checks After Installation
- Posi-Track Replacement Tracks We Carry
- Confirm Fit and Order a Matched Pair
Why Posi Track Tracks Are Not One-Size-Fits-All
Say a contractor orders a replacement because the width and tread look right in a listing. The belt goes on, but it rides wrong on the rollers, won't hold adjustment, or loads one side harder than the other. The machine is still down, and now there's a return to argue about.
Posi-Track isn't a generic size. It's a design family tied to ASV's rubber-tracked compact track loader platform. That family became commercial with the Posi-Track MD-70 introduced in 1990, described in the Equipment World compact track loader buyer's guide as ASV's first commercial compact track loader. From there, undercarriages, machine families, and track dimensions developed as proprietary systems, not as one universal standard.
That's why two tracks with similar tread can fit very differently. Generation, model, and undercarriage layout change what the belt has to engage, how it's guided, and how much adjustment room you have. A visual match proves almost nothing.
Work through three questions in order. First, what do the three size numbers mean? Second, what has to match beyond dimensions? Third, how do you confirm fit and current use on your own machine before ordering a matched pair?
Read Your Current Track Size in Three Numbers
Start with the three-number size code. It gives you width, pitch, and link count, in that order. You need all three before you compare any listing.
| Position in code | What it measures | How to check it | Why a mismatch matters |
|---|---|---|---|
| First number (380) | Track width in mm | Measure across the belt from outer edge to outer edge | Wrong width causes rubbing, edge wear and roller misalignment |
| Second number (101.6) | Pitch in mm | Measure the distance over five pitches and divide by five | Pitch must match drive cleats or the track will not engage correctly |
| Third number (42) | Link count | Count the links around the inside of the track | Changes total length and the adjustment range for tension |
Work Through One Code
Take 380x101.6x42, a common Posi-Track size. That means a 380 mm wide track with a 101.6 mm pitch and 42 links. Width is the belt's outer measurement in millimetres. Pitch is the spacing between drive cleats. Link count is the number of links around the inside of the track.
Read the numbers in sequence and write them down exactly. Don't round width to the nearest inch and don't guess pitch from a photo. A small error in pitch repeats at every cleat, so the track can't engage cleanly even if it looks close on the ground.
Find the Code Before You Remove Anything
To check fit, look for the size molded on the inside of your current track. Do that before you pull the old belt off, while you can still rotate it into a readable position and clean the rubber with a stiff brush. Photograph the marking and keep the photo with the machine serial number.
If the code is worn, rubbed flat, or covered in cuts, measure it yourself. Our guide to measuring your rubber track walks through the same three fields in order, so you don't mix up pitch and total length.
Measure a Worn Track Correctly
For width, stretch a tape across the belt from outer edge to outer edge at a spot that isn't chunked or torn. Measure in two places. If the readings differ because an edge is damaged, use the undamaged section.
For pitch, don't measure a single space and trust it. Measure the distance over five pitches, then divide by five. That averages out wear and a slightly crooked tape.
For link count, mark one inside link with chalk or a paint pen, then count every link around the inside until you return to the mark. Count twice. One missed link changes total length, and total length decides whether your tension adjustment can take up the belt or runs out of travel.
Practical rule: If you can't read or measure all three numbers with confidence, you don't have a size yet. You have a guess.
Those three numbers describe dimensions only. They don't tell you how the machine drives the belt, how the carcass is reinforced, or whether the guide geometry suits your rollers. A track can match width, pitch, and link count and still be the wrong part.
Why Matching Dimensions Is Not Enough
A conventional undercarriage drives the belt with sprocket teeth engaging drive lugs. A Posi-Track undercarriage doesn't work that way, and that difference is where dimensionally correct tracks fail.
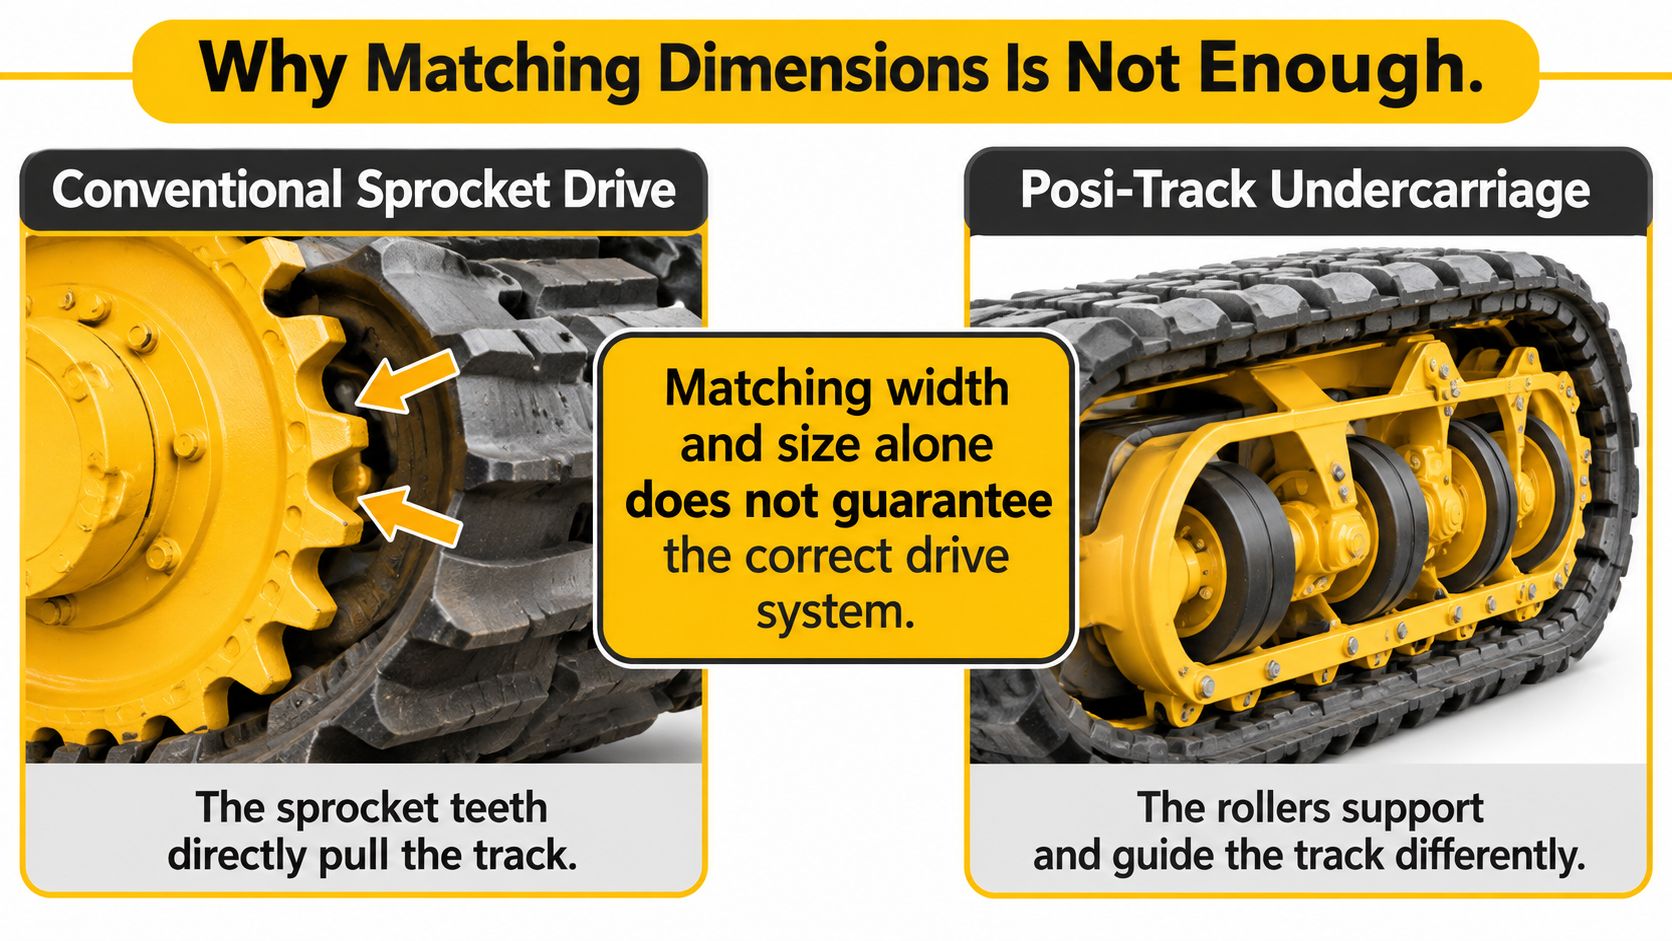
As the Equipment World report on ASV's Posi-Track undercarriage explains, ASV replaces conventional sprocket-to-drive-lug tooth engagement with rollers arranged in a cage-like system, which reduces friction at the drive interface. Torsion-bar suspension and bogey-mounted rollers absorb shock and twisting before those loads reach the chassis. The belt has to work with that roller system, not just fit around it.
Compare How Each System Moves the Belt
| Factor | Positive-drive track | Friction-drive track | Posi-Track roller system |
|---|---|---|---|
| How power transfers | Internal track features engage drive components | Contact friction between belt and drive | Roller cage engages the drive instead of sprocket teeth |
| Fitment risk if mismatched | Track may fail to transmit power correctly | Slip under load and uneven wear | Track may not seat on the roller system, causing abnormal loading |
| Where to confirm | Machine manual or dealer records for drive type | Machine manual or model documentation | Machine model, serial number and ASV undercarriage documentation |
| Common misconception | Assumed to be a tread or compound upgrade | Assumed to be interchangeable with any belt of the same size | Assumed to be a generic sprocket-drive track of the same width |
Tread pattern alone is insufficient. What matters is whether carcass reinforcement, dimensions, and the belt's interaction with the roller and drive system suit the machine. Get that wrong and you'll see derailment, accelerated wear, or abnormal loading instead of a simple sizing problem you can tension away.
Reinforcement matters under contamination, too. The track uses longitudinal poly-cord reinforcement and is designed to stretch when rocks or debris enter the undercarriage, so the belt accommodates a transient load instead of passing it all on as a rigid impact. A substitute with a different carcass may measure the same on a tape and behave differently the first time it swallows a rock.
OEM Versus Aftermarket Comes Second
An OEM track from the machine manufacturer and an aftermarket track built to the same drive type, size code, and link count are both legitimate options. Neither is valid if the drive type is wrong. Brand origin doesn't rescue a belt that can't transmit power correctly on your undercarriage.
For either option, ask two direct questions. Will the supplier confirm fitment against your model and serial number, not just the size code? Is the track sold as a matched pair? A listing such as a ASV RT75 rubber track in 450x101.6x51 or 500x101.6x51 shows why the full code belongs in the product name, because the same machine was built with more than one track width.
Treat tread or compound upgrades as a separate decision after fit is confirmed. I wouldn't discuss tread at all until drive type and size code both check out.
Matching the Track to How the Machine Is Used
Buy for the work the machine does now, not the work it did for its first owner. A loader that once did occasional landscaping and now grades daily, works muddy sites, or goes out on rental has a different duty cycle, more contamination exposure, and more operating hours. The old track choice may no longer fit the job, even if the size code hasn't changed.
That shift is happening across the category, with Case's report on compact track loader use citing a 12.9% year-over-year increase in new financed U.S. compact track-loader sales from March 2024 through February 2025, exceeding 54,000 financed machines. More machines are moving between construction, landscaping, agriculture, rental, and land clearing, so inherited assumptions about use get stale fast.
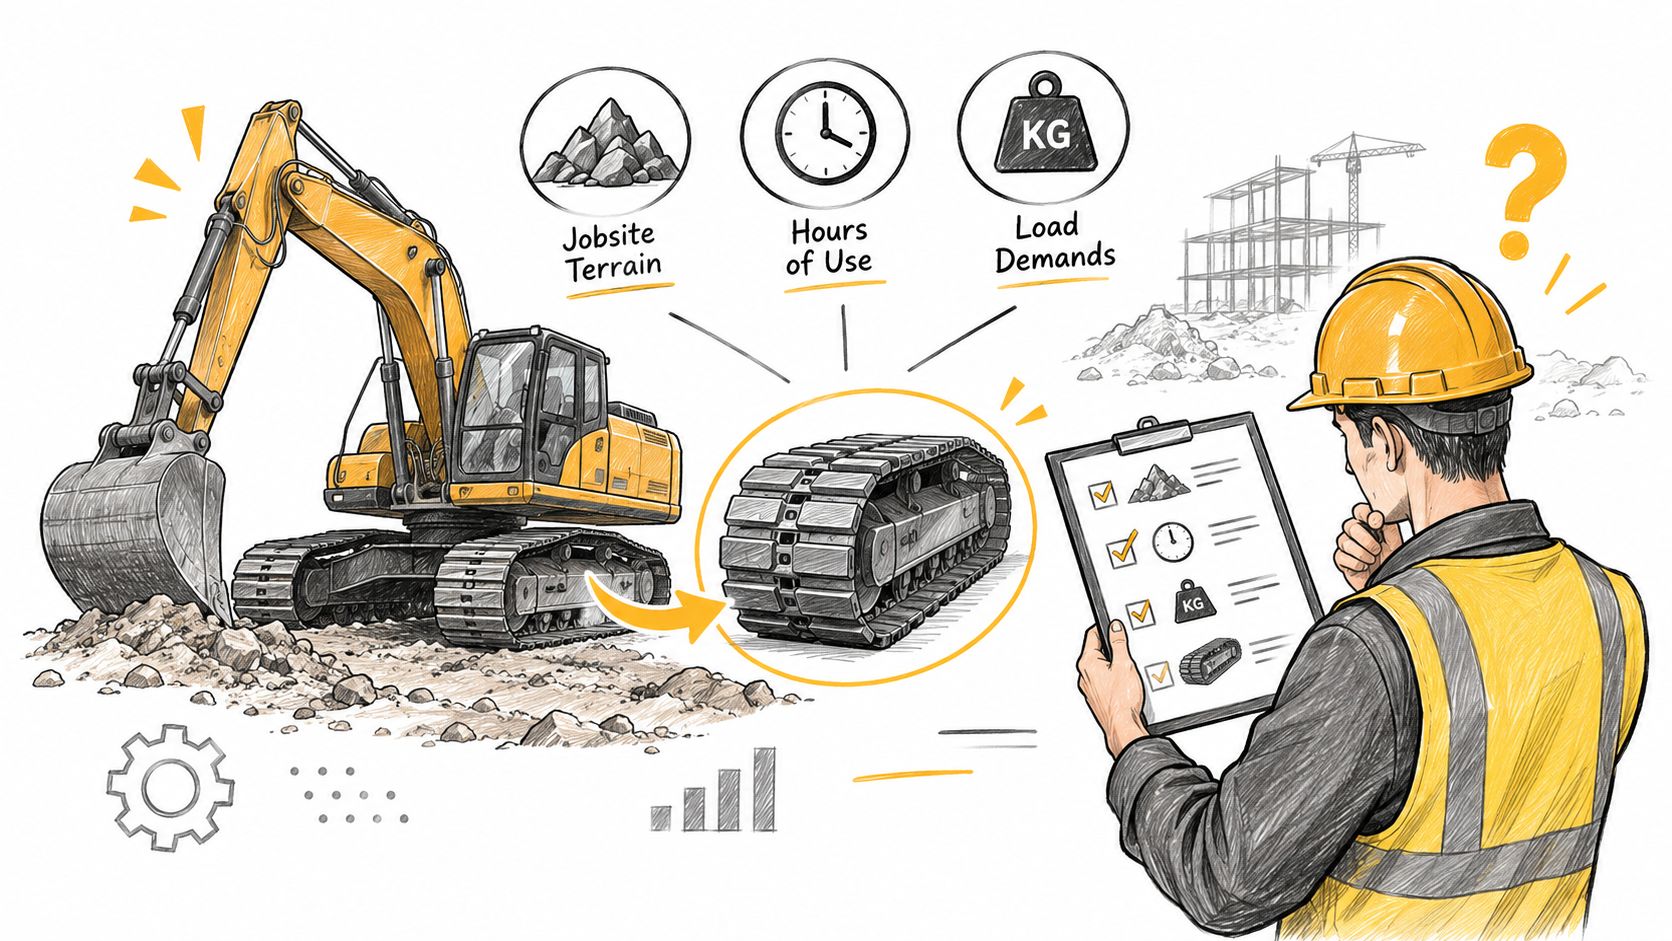
Answer Six Questions Before You Choose
- Hours per week: High hours shorten inspection intervals and make downtime costlier than a small price gap.
- Abrasive soil or rock: Sharp, rocky ground puts more weight on cut and wear resistance.
- Road travel: Regular travel on pavement or gravel heats and grinds rubber faster than soft ground work.
- Turning on hard surfaces: Frequent counter-rotation on concrete scrubs edges and stresses guide lugs.
- Undercarriage cleanliness: Packed mud and debris raise loads on rollers and hide damage until it's advanced.
- Rental or fleet service: Multiple operators make matched pairs, written inspections, and a maintenance log worth more than the lowest unit price.
Heavy daily grading pushes you toward durability and predictable wear, not the cheapest compatible belt. Muddy or contaminated sites make cleaning discipline and inspection frequency part of the purchase decision, because a good track run dirty still fails early. High-hour rental use argues for replacing both sides together so left and right performance stay matched for the next operator.
The cheapest compatible track can carry the highest ownership cost if it brings downtime, accelerated wear, or mismatched left and right performance.
Write your answers down and keep them with the machine file. They'll shape tread and compound expectations, inspection intervals, and whether a matched pair makes sense this time.
How to Verify Fitment Before You Order
Do this with the machine in front of you, not from memory at a desk. You'll need a tape, a brush, chalk or a paint pen, and the machine manual or dealer record for drive type.
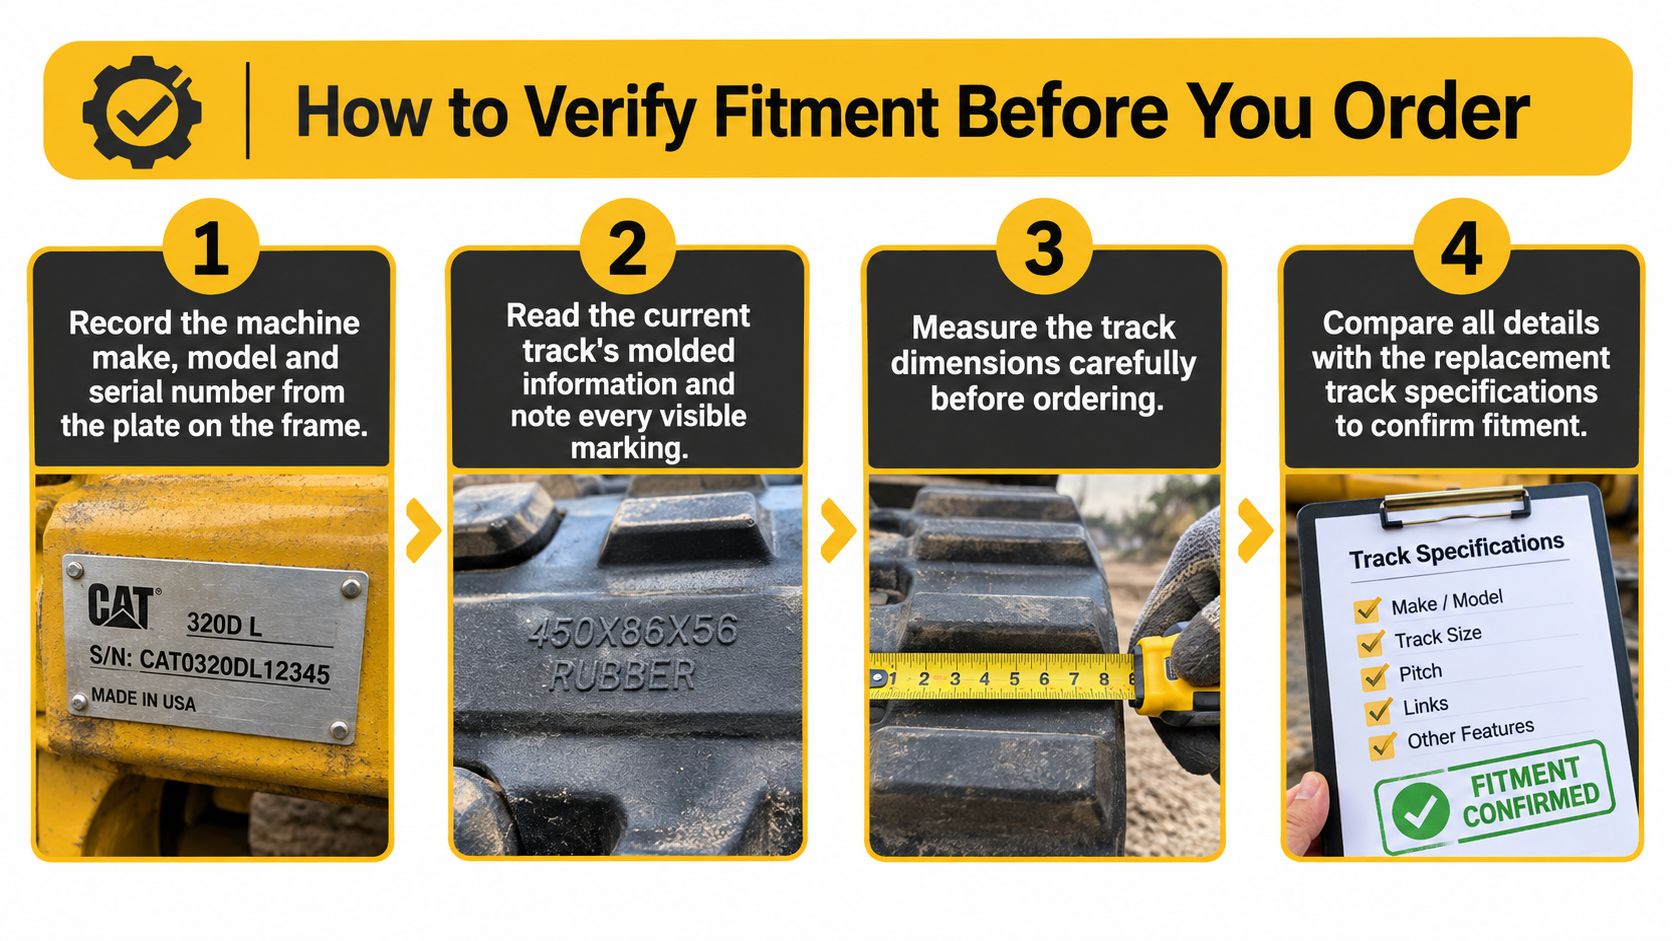
Run the Seven Checks in Order
- Record the machine identity. Write down the make, model, and serial number from the plate on the frame. Photograph the plate, because a transposed digit sends the supplier to the wrong machine family.
- Read the current track size. Record width, pitch, and link count from the molded marking, or measure them if the marking is gone. Keep the three fields separate instead of writing one overall length.
- Confirm drive type and adjustment range. Check the manual or dealer records for the drive type and the permitted tension adjustment range. Michelin's technical explanation of agricultural track systems describes positive-drive systems for compatible equipment, which underlines the point that drive architecture is a compatibility class, not a tread upgrade.
- Compare field by field. Match the new track's listed width, pitch, and link count against your recorded code one field at a time. Don't accept a match on width alone, and don't let a seller substitute a close pitch.
- Confirm the drive systems agree. A positive-drive track transfers power through mechanical engagement between internal track features and drive components, while a friction-drive track relies on contact friction. They aren't interchangeable just because the belts measure alike.
- Send the full identity to the supplier. Send make, model, serial number, and current size code, and ask for confirmation before the order ships. You can narrow candidates first with a track size finder, but the serial-based confirmation is the step that settles it.
- Check the new pair before installation. Lay both tracks side by side, confirm link count, and check that you'll have adjustment room once fitted. Catching a packing or picking error on the ground costs minutes, not a second teardown.
Step 5 catches the mistake a dimension chart can't. Buyers comparing across machine categories often see general replacement pages for compact loaders and mini excavators that don't clearly distinguish drive architecture. Your manual, sprocket or drive-lug design, and serial number settle the question. A size chart doesn't.
Fitment is confirmed only when model, serial number, size code, and drive type all agree.
If one field conflicts, stop and resolve it before payment. Don't order on three out of four and hope tension adjustment absorbs the difference. It won't fix a drive mismatch.
Tension and Wear Checks After Installation
A new track can measure correctly and still fail early if tension is set by feel. After installation, the key test is how the complete drive system runs under load: sprocket engagement, guide-lug tracking, roller alignment, and the work the machine truly does.
An under-tensioned track carries slack that permits movement, derailment, and impact loading as the belt engages the drive system. An over-tensioned track raises bearing, roller, idler, and carcass loads, adding friction and heat without improving normal traction. Tighter only changes which parts wear first.
Set Tension to the Stated Rule
Park on level ground and clear packed debris from the undercarriage before reading sag, because material in the frame changes the result. The ASV 2810 manual on ManualsLib describes adjusting a Posi-Track system until sag between the drive sprocket and upper carrier wheels is eliminated, while warning against further tightening. Stop at that point, then confirm the setting sits inside the manufacturer range.
| Symptom | Likely cause | First check or fix |
|---|---|---|
| Track sags or slips off the roller guides | Slack lets the belt move sideways under load | Clear debris, then tighten only until sag between drive sprocket and upper carrier wheels is gone |
| Bearing, roller or idler noise and heat | Excess tension is loading rotating parts | Loosen back into the specified range and recheck on level ground |
| Track jumps or derails on turns | Slack plus debris, misalignment, or wrong link count | Clean the undercarriage, reset tension, and compare link count with the old track |
| Rapid edge wear on one side | Uneven pair behavior or frame and roller misalignment | Confirm both tracks match, then inspect frame and roller alignment |
| Cracking or stretch beyond adjustment range | Carcass is wrong for the machine or at end of service life | Compare with the manufacturer specification and replace as a matched pair |
Don't Tension Away the Design Advantage
These machines float because the wide contact patch spreads machine weight across the ground. A belt held drum tight works against that design, loading the components meant to support it and shortening the life you just paid for.
Before calling a new track defective, clean the undercarriage, recheck tension on level ground, and verify pitch, width, link count, guide-lug geometry, and remaining adjustment range. I would diagnose tension and debris first every time. They cost less than a belt, and they are usually where the problem started.
Posi-Track Replacement Tracks We Carry
These replace the OEM tracks on ASV and Posi-Track compact track loaders. Each one is sold as a single track or a pair, with a 30 month warranty and free 1-3 day shipping. Check the size molded on your current track against the code below before you order.
- ASV PT-50 rubber track: 380x101.6x42
- ASV PT-60 rubber track: 380x101.6x42
- ASV RC-50 rubber track: 380x101.6x42
- ASV RC-60 rubber track: 380x101.6x42
- ASV SC-50 rubber track: 380x101.6x42
- ASV ST-50 rubber track: 380x101.6x42
- ASV VT70 rubber track: 380x101.6x42
- ASV SR70 rubber track: 380x102x51
- ASV RCV rubber track: 450x101.6x51
- ASV 4810 rubber track: 457x101.6x55
- ASV RT40 rubber track: 280x101.6x37
- ASV RT75 rubber track: 450x101.6x51 or 500x101.6x51
Not sure which size you have? Send your model and serial number and we will confirm fitment before your order ships.
Confirm Fit and Order a Matched Pair
You should now have four fields that agree: the make, model, and serial number from the frame plate, the current size code, the drive type, and the permitted tension range. That is your ordering packet. Do not reduce it to a width and a phone call.
Tracks are sold as a single track or a pair. A pair puts both sides in one order, which keeps left and right wear matched from the first hour, instead of pairing a fresh belt with a stretched one and chasing uneven tracking. If one side failed from damage and the other still looks sound, raise that before ordering rather than assuming a single replacement will track straight.
Send a Message That Forces a Complete Answer
Send the make, model, serial number, drive type, and the size code read from inside your current track. A real person helps customers find the right track fit before they order, so use that check instead of relying on a listing title. On Cat fitments, the model and track size get matched first, then the serial number is used to confirm fitment before the order ships.
A reply confirming only width, pitch, and link count is still incomplete. I would treat drive-lug engagement, guide-lug geometry, roller path, and how the machine is used as part of fitment, because a dimensionally correct track can still derail, bind, or wear fast on the wrong setup. If those points stay vague, do not release the order.
Confirm shipping and warranty terms at the point of order. The tracks carry a 30 month warranty, and you want the claim route, dispatch timing, and pair pricing clear before the machine is sitting on blocks.
Keep the Paperwork That Proves the Starting Point
- Fitment confirmation: Save the reply or order note used to confirm the track against your machine.
- Serial number: Keep the frame plate photo with the order record.
- Installed size code: Record the code from the new belts, not just the invoice.
- Install date and first tension readings: Log both, plus the machine hours at installation.
That file gives any later warranty or downtime claim a clean starting point. It also makes the next replacement faster, because you will not be measuring a worn belt from scratch.
Send your make, model, serial number, drive type, and current size code so fitment can be checked before your matched pair ships, backed by a 30 month warranty. Visit DirtPusher to start that check today and get your loader back to work on the right tracks the first time.