

The track still has tread, the job starts in the morning, and you're trying to decide whether these compact track loader tracks will make it through another week. That call gets expensive when the steel cords are already open to water, or when a new belt goes on a sprocket that can no longer drive it cleanly. Brand on the box doesn't settle it. The measurements and the undercarriage do.
Table of Contents
- Know When to Replace Instead of Repair
- Measure Your Track Size Before You Order
- Confirm the Fit Before You Order a Pair
- Prepare the Machine and Work Area Safely
- How to Swap the Track Step by Step
- Check the Undercarriage Before Fitting the New Track
- Set Tension and Protect the New Track
Know When to Replace Instead of Repair
The failure that strands a machine isn't a bald tread. It's a cut or chunk that reaches the steel cables. Water gets in, the cables oxidize, and the belt can snap while plenty of rubber is still on the lugs. For Construction Pros describes that path clearly: once the reinforcement is wet, oxidation can break the cables and take the whole belt.
Tread depth is only one signal. Exposed metal imbeds outside the guide-lug area mean a hard hit, often from debris trapped between the track and the undercarriage. Body cracks, rubber pulling off the inserts, and sprocket teeth that no longer seat the lugs are replacement conditions, not "run it and watch" conditions.
Under proper maintenance, manufacturer guidance puts expected rubber-track life at roughly 1,200 to 1,500 operating hours, and that window moves with ground conditions, hard-surface travel, and how you turn, according to the Cat track selection guide. Plan the swap as you enter that range, and look at sprockets and rollers in the same visit. A used pair can bridge a short season if the steel is intact, which is the point of comparing used skid loader tracks against a full replacement rather than guessing from the tread alone.
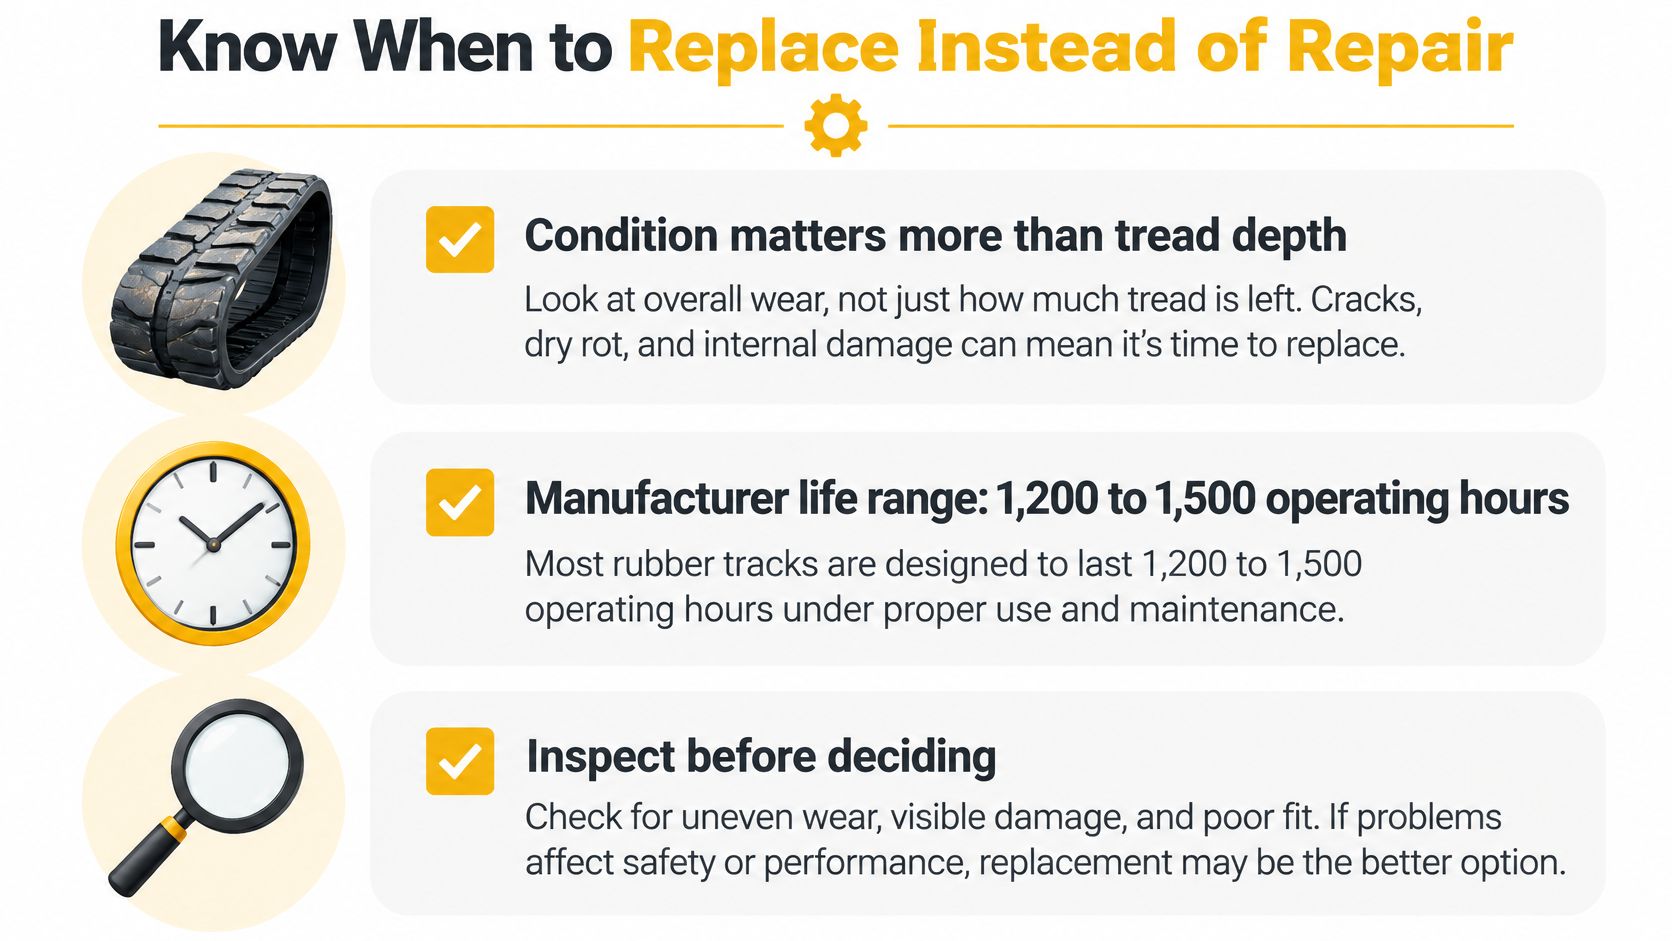
| Condition | Action | Timing |
|---|---|---|
| Tread worn, steel and cords intact | Keep running and log tread depth weekly | Recheck at each weekly inspection |
| Cut or chunk reaching steel cables | Replace the track | Before further use |
| Exposed metal imbeds outside the guide-lug area | Remove debris, check the undercarriage, then replace | Before further use |
| Body cracks or rubber separating from inserts | Replace the track | Before further use |
| Sprocket teeth hooked or worn | Replace the sprocket with the track | During the same job |
| Hours approaching 1,200 to 1,500 | Plan replacement and inspect sprockets and rollers | Schedule before a job depends on the machine |
Practical rule: If steel or cords are open, the track is done, even when the lugs still look thick.
Measure Your Track Size Before You Order
Width is the number people botch, because they measure the lug instead of the belt. Set a tape across the full rubber band, outside edge to outside edge, and write the result in millimeters. A 15 mm miss won't seat, and it won't match the listing.
Then take pitch, the center-to-center distance between two adjacent metal links. Measure on the track while it's still on the machine if you can. Edge-to-edge of a single link is not pitch, and that error orders a belt the sprocket can't drive.
Last, count every link or lug around the belt. Mark each one with chalk so a worn, flattened lug doesn't get skipped. John Deere's rubber track guide treats width, pitch, and link count as one set, checked against the parts documentation, because tracks that look alike can differ in pitch or link count.
Record make, model, and serial number beside those three numbers. Two 400 mm belts can share a frame opening and still miss the sprockets if the pitch doesn't match. Our track measurement guide walks the same four checks before you open a listing.
| Measurement | How to Measure | What to Check | Common Error |
|---|---|---|---|
| Track width | Measure the full rubber band across the outside edge in millimeters | Compare with the parts manual for your model | Measuring lug height instead of full width |
| Pitch | Measure center to center between two adjacent metal links | Match against the parts documentation | Measuring edge to edge of one link |
| Link count | Count every lug around the full belt, marking each as you go | Confirm the total against your machine listing | Miscounting when lugs are unevenly worn |
| Machine identity | Record make, model and serial number | Confirm configuration and any special options | Relying on model name alone |
Write all four values on paper before you shop. Compare every value, not just the width.
Confirm the Fit Before You Order a Pair
Match those four numbers to the listing line by line before you pay. A 400x86x53 track is 400 mm wide, with an 86 mm pitch and 53 links. A 320x86x53 track keeps the same pitch and link count and changes only the width. Pitch agreement is not a fit.
We sell the Cat 259D rubber track 400x86x53 at 400 mm (15.7 in) wide with an 86 mm pitch and 53 links, and the narrower Cat 259D 320x86x53 as a pair for $1,269.00. Order both sides together so the pair matches. Send make, model, and serial number so the configuration is confirmed, not assumed from the model badge. The same habit applies when you're sorting John Deere skid steer tracks: every dimension has to agree.
If the sprocket teeth are hooked, put the sprocket on the same order. Then compare hours left on the old belt with what a mid-job failure costs you in lost time. Schedule the install with the inspection and tension steps below, not as a "we'll figure tension later" job.
Prepare the Machine and Work Area Safely
A track under tension can shift the machine the moment you crack the adjuster. Do this before any grease fitting is opened.
- Park on firm, level ground, clear of slopes, traffic, and soft spots. Once tension is gone, a machine on a grade can roll.
- Lower the lift arms and the attachment all the way to the ground. Weight should sit on the frame, not on hydraulic pressure. Working under arms held only by the hydraulics is how people get pinned.
- Set the parking brake, shut the engine off, and take the key.
- Chock the tracks on the side you are not lifting, with blocks rated for the machine. Flat-looking ground is not a substitute for a chock.
- Wash mud, rock, and packed debris off the undercarriage. Grit hides cracks and ends up in your gloves.
- Set out a rated jack, stands, the track tension tool, the operator manual, gloves, and eye protection.
- Have a second person there, and confirm the new track matches your four measurements before the old one comes off.
Lift points and the tension setting come from that manual, not from memory of the last machine you worked on.
How to Swap the Track Step by Step
Leave the old track on until the frame is on stands. The graphic below is the order. The notes under it are the reasons people skip and then redo the job.
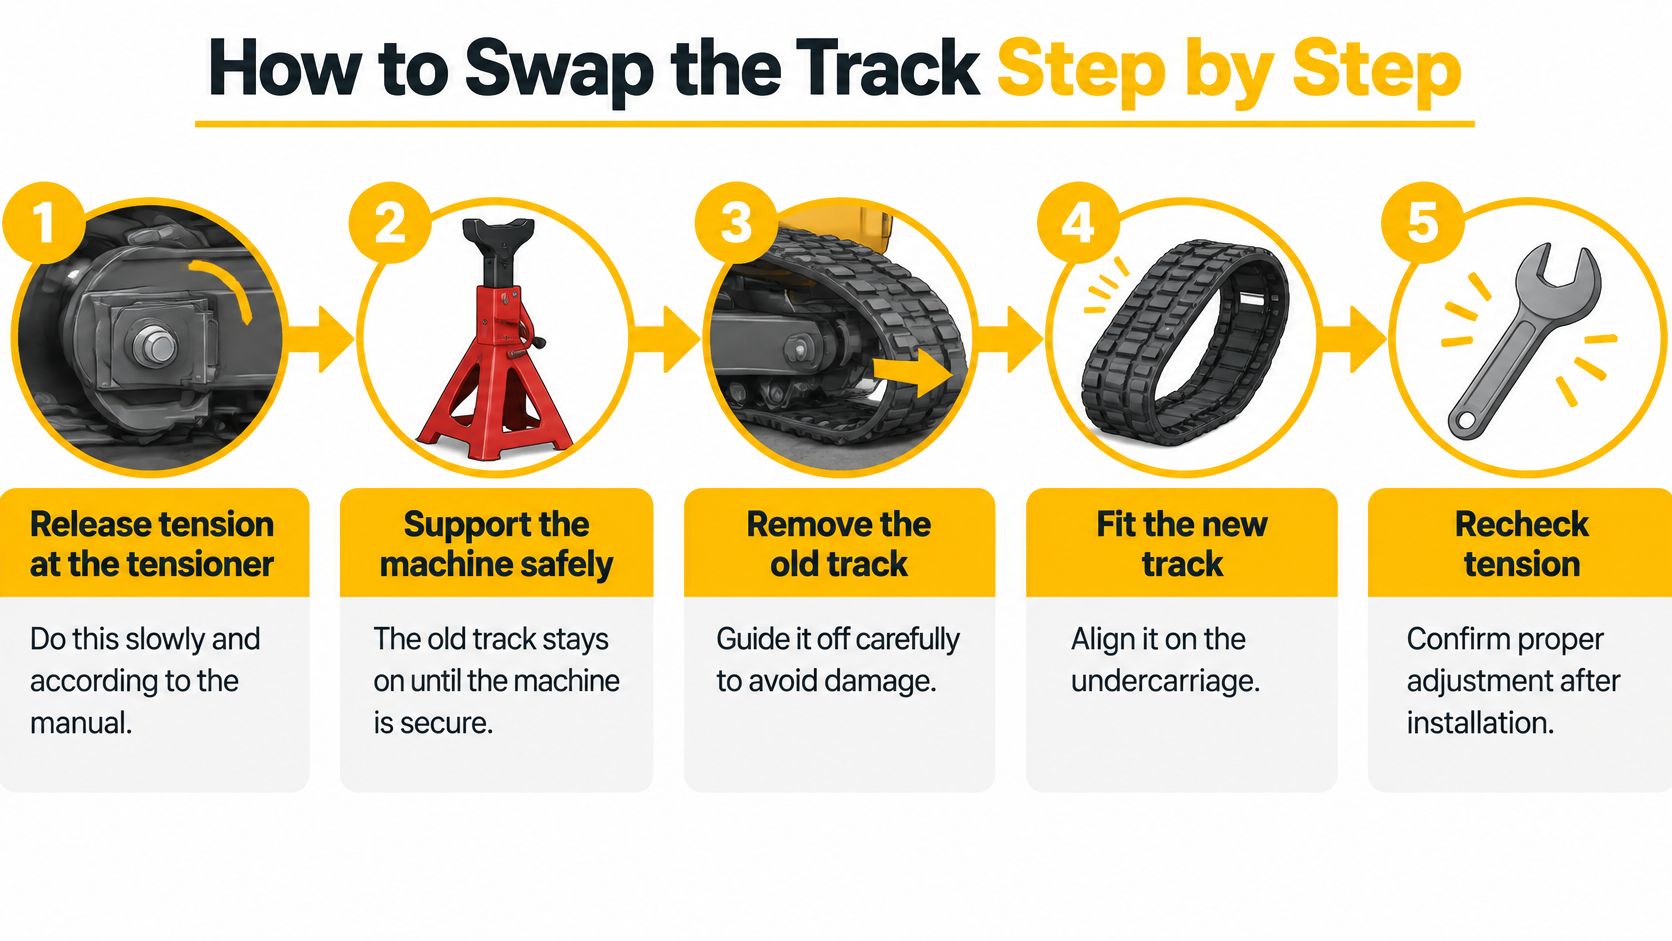
- Release tension at the tensioner exactly as the manual describes, and do it slowly. Grease in that cylinder is under pressure and can spray.
- Jack the frame only at the lift points named in the manual, then set it on stands. The old track stays in place until those stands are carrying the weight.
- Rotate the old track off the drive sprocket and idlers by hand, one side at a time. Keep fingers out of the pinch between lug and tooth.
- Stop. Finish the undercarriage check before anything new goes on. A fresh belt on a bad sprocket is a second purchase.
- Lay the new track out and read the direction arrows or lug orientation. Backward rubber walks off center.
- Feed it over the idlers and onto the drive sprocket so the teeth sit in the lugs and the belt is centered on the rollers. A track started crooked rides off on the first turn.
- Take up slack to an approximate tension, then lower the machine off the stands. Final sag comes after it is on the ground, not while it's hanging.
- Drive slowly forward and back for a few minutes, stop, and recheck tension and centering. Have the second person watch the belt while it moves. Driving it hard before that check lets a loose track slip sideways.
This short walk-through shows the same sequence on a machine, including how the belt comes off the sprocket once tension is gone.
You're done when the track stays centered and holds tension after that slow drive, not when the last bolt feels snug.
Check the Undercarriage Before Fitting the New Track
Sprockets kill more new belts than bad rubber does. A hooked, sharpened, or worn tooth grabs the lug, slows that spot, and chews the embed. If the tooth no longer matches the lug opening, replace the sprocket in the same job. Doing the track twice costs more than the sprocket.
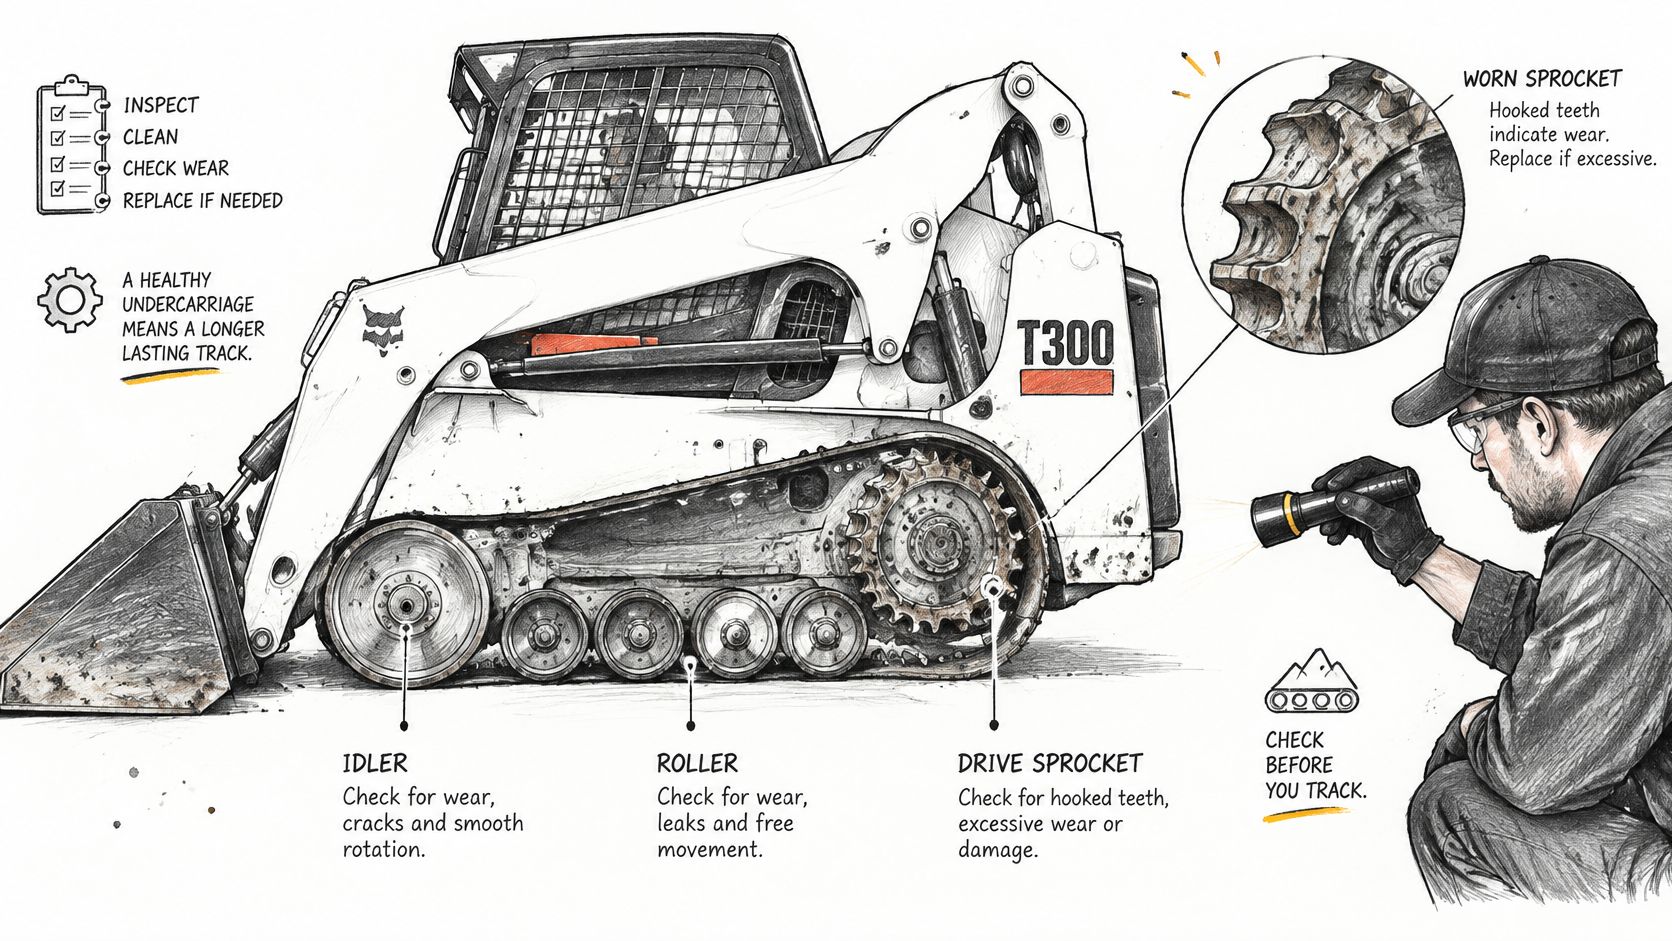
Turn each roller and idler by hand. Grinding, a flat spot, or a seized bearing wears the inside of the belt. A machine that throws a new track on every hard turn often has a flat-spotted roller on that same side. Check the idler for cracks and for a lean that pulls the belt off center.
What else to clear
Look for packed mud, rock, or wire wrapped on the axles. Compare sprocket tooth spacing with the lug spacing on the new track. A pitch mismatch is one of the costliest orders you can make, because the belt will never drive evenly.
Mark each part pass or replace, and keep the note for the first weekly check:
- Sprockets: Teeth full and square, or hooked and due for replacement with the track.
- Rollers: They spin freely, with no flat spot and no grind.
- Idlers: Straight, undamaged, and free of wrapped debris.
Set Tension and Protect the New Track
The only correct sag is the deflection in your operator manual. A new belt settles, so recheck within the first few hours, not only on install day. Too tight, and you grind rollers and rubber. Too loose, and the belt walks off in a turn.
Habits that actually save rubber
Wider turns and less spinning while you push keep lugs from tearing. Counter-rotation and high-slip turns wear faster than straight travel. Keep road moves slow, and don't live on pavement, where rubber heats and scrubs. Ease the load instead of crowding the hydraulics on slick ground. After oil, salt, fertilizer, or manure, rinse the undercarriage with fresh water the same day so those materials don't sit on steel and rubber.
Log tread depth and the hour meter every week. Two or three readings give you wear per hour, which is how you schedule the next pair before it fails on a job. Each day, walk the machine for cuts, cracks, missing blocks, exposed cords, loose imbeds, and rubber moving around the links. Stop if a cut reaches steel. Each week, repeat the undercarriage look, the sag check, and the tread log.
If the track comes off after the install, check tension first, then flat spots on the roller on that side, and only then idler alignment.
| Interval | What to Check | Action |
|---|---|---|
| Daily | Cuts, cracks, missing tread blocks, exposed cords, loose imbeds | Stop and report any cut reaching the steel |
| After first few hours | Tension on the new track | Adjust to the manual value |
| Weekly | Undercarriage, sprockets, rollers, sag, tread depth | Compare tread depth with the previous reading |
| After exposure to oil, salt, fertilizer or manure | Undercarriage and track surface | Rinse with fresh water the same day |
DirtPusher sells aftermarket rubber tracks for compact track loaders, skid steers, and mini excavators, sized by width, pitch, and link count so the pair matches the machine you measured. If you're ready to order from the four numbers on your notepad, visit DirtPusher and match the listing before the old belt fails on the job.